When Should You Upgrade - Part 1: iOS 15, iPadOS 15 & watchOS 8
When Should You Upgrade - Part 1: iOS 15, iPadOS 15 & watchOS 8
The Versatile Apple Wallet
I seldom carry my wallet around since Apple introduced Wallet to iOS and Watch . With ApplePay being available at so many places and cash seldom needed it is really only for identification that I need a wallet. Even that is on the way out as more states are allowing driver's licenses and state IDs to be virtually carried. Whether it is tickets to the Celtics game or that rock concert, airplane boarding passes, hotel room keys, auto keys, home keys, loyalty cards and so much more can be carried virtually with Apple Wallet.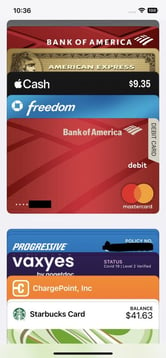
Apple Wallet was originally called Passport and introduced at WWDC in 2012 and renamed to Wallet in 2015. Apple has been adding features and capabilities to Wallet ever since. Cashiers are no longer amazed when I pay for my groceries by waving my Apple Watch over the terminal and some venues will only use virtual tickets for entry. I carry my vaccine card, insurance info and a host of credit and debit cards all virtual. Many hotels now allow virtual keys so many times I do not even have to go to the front desk to check in, the key is sent to my Wallet and the electronic locks recognize me.
Wallet is also where Apple's innovative credit card lives along with Apple Cash that allows you to send and receive cash easily. If you haven't started using Wallet yet, here is how you can check it out.
Wallet on iPhone, iPod touch, and Apple Watch allows you to easily manage payment cards, boarding passes, tickets, gift cards, and other passes. Wallet is time and location enabled, so passes can be configured to display on the user’s device at the appropriate moment, like when the user reaches the airport or walks into a store. Passes can also be updated with push notifications so, if details change you can simply tap the notification to view the updated pass.
Set up Apple Pay
To set up Wallet for payments you need to set up Apple Pay. You will need
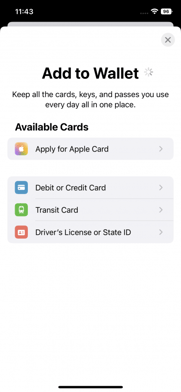
Add Your First Card
If you have all that you need to add your first credit or debit card:
It is important that you set your default card - the one that will first pop up when you use Wallet. The first card you add to your Wallet becomes your default card for payments. To set a different card as the default, move it to the front of the stack.
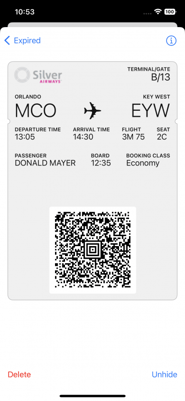
Add a Boarding Pass
When you add a boarding pass, ticket, or other pass to the Wallet app on your iPhone, you automatically add it to the Wallet app on your paired Apple Watch.
Sharing a Pass
You can share some passes and tickets in the Wallet app with other iPhone or Apple Watch users.
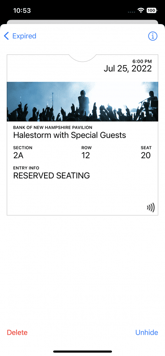
If you don't see the share icon, the merchant or company that issued the pass or ticket hasn't enabled sharing in the Wallet app.
Add your Driver's License?
Want to add your driver's license to Apple Wallet? Right now, the Wallet driver's license feature is only available in Arizona and Maryland but soon Colorado, Connecticut, Georgia, Hawaii, Iowa, Kentucky, Mississippi, Ohio, Oklahoma, Puerto Rico, and Utah will join the digital driver's license and state ID program and I assume other states will follow suit soon.
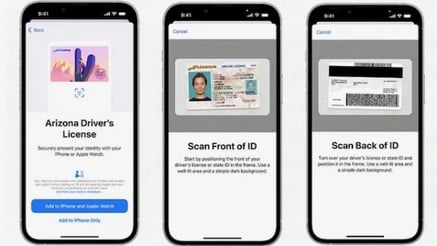
If you have all that here's what you do:
Next, you need to confirm that you're you.
To prove that you're really you, you're prompted to complete a series of head or facial movements. For example, you might be asked to smile or turn your head to the right. After the movements, you take a selfie. To help this process:
When you're ready to send your information to your state issuing authority, authenticate with Face ID or Touch ID.
Once you have your cards, passes and perhaps your ID in Apple Wallet you are almost ready to use them. I would suggest that you first visit the Wallet & Apple Pay settings to refine your settings. Here you can see which cards are listed, add cards and toggle some handy features.
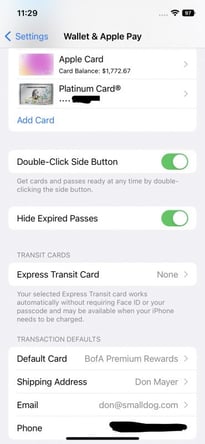
Here you can toggle the double-click on the side button to quickly bring up your default card to pay, hide passes that are expired and if you have an express transit card you can just pull out your phone and wave it at the terminal without waking up the phone.
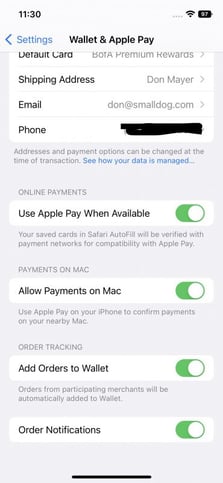
You can also toggle to use Apple Pay online when you are shopping at vendors that support Apple Pay and allow payments from your Mac, too. If your vendor is hip you can also add the orders to the Wallet and get notifications about the progress of your order.
I have really only touched the surface of the capabilities of this innovative Apple app. It has become so much a part of life that I don't know how we did without it!
When Should You Upgrade - Part 1: iOS 15, iPadOS 15 & watchOS 8
April 1, 1976 - Happy Birthday Apple!
Stay Safe - Please Call Apple Support Scam