iOS 16 - Removing Objects from Photos
iOS 16 - Removing Objects from Photos
Using Apple Photos Editing Tools
 This is going to be a multi-part article on using Photos on your Mac (using it on iPad or iPhone is very similar) to improve and preserve your photos.
I have been an amateur photographer for a long time. I remember taking shots of the Chicago skyline with my father as a child and was actually a sports photographer for a local paper when I was in high school. I built a dark room at my house here in Vermont and spent hours in there with dangerous chemicals printing pictures and developing film.
I was thrilled when the move to digital photography happened. I remember one of Small Dog's biggest early purchases was a couple pallets of Apple QuickTake cameras. That set a sales record for the fastest sales which stands to this date.
With the pandemic and the time I have at home, I decided to take a digital photography course online to see if I could hone my skills. I am learning some stuff about how to compose and take good shots. There is a lot you can do at the camera end to get a good shot. In the old film days, bracketing (taking multiple shots with different exposures) was one way of making sure you got the right shot. The other way to edit was in the darkroom. Now it is all digital and way way more versatile.
Grace and I decided to go through the literally thousands of slides we have accumulated. This project took a few days, several garbage bags and my old Kodak Carousel projector. We ended up with a pile of a couple hundred that we wanted to digitize. I sold my projector because we will never use it again but to digitize these slides I had a few options:
I chose the digitizer and after some research settled on the Kodak Scanza which at about $150 had great versatility and was easy to digitize the slides. I did not bother to use the Scanza editing tools since I had Photos ready.
So, quite a few of these slides had washed out, were taken at the wrong exposure or could be improved with editing in Photos. So, digitizing was only step one. I am going to go over the various tools that Apple has given us in Photos to make your photos great. Sure you can use more powerful tools like Photoshop or my favorite GIMP - GNU Image Manipulation Program which is a free open-source photo editing software program but for most editing purposes the tools built into Apple Photos will suffice.
When you are looking at a single photo in Photos you have several editing options.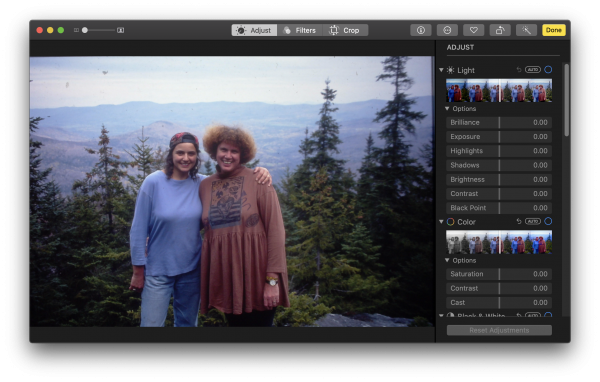
Starting on the right you have a zoom bar that will allow you to alter your composition. Remember that zooming in too much will reduce the sharpness of the picture. Next are three choices, adjust, filters and crop. We will talk about all of those but lets continue across the menu bar.
The get info tab ![]() will give you information about that photo like the file name, the camera used, the date the picture was taken, the lens, the aperture, the shutter speed and the ISO or the exposure triangle.
will give you information about that photo like the file name, the camera used, the date the picture was taken, the lens, the aperture, the shutter speed and the ISO or the exposure triangle.
You can also add details to your photos, like a description, keywords, or a specific location. You can even Add Faces to name your friends and family in each photo.
The next tab will give you some options like markup which is handy if you want to add text, arrows or other mods to the photo. We will go over these in detail in another article.
The heart icon will allow you to save the photo as a favorite.
![]() Turn your photo 90 degrees counterclockwise. If you want to rotate the other direction, hold down the Option key.
Turn your photo 90 degrees counterclockwise. If you want to rotate the other direction, hold down the Option key.
![]() The Enhance magic wand will take all the fun out of photo editing but if you are in a hurry clicking on the wand will improve your photo with just one click. It will automatically adjust your photo's color, light and contrast.
The Enhance magic wand will take all the fun out of photo editing but if you are in a hurry clicking on the wand will improve your photo with just one click. It will automatically adjust your photo's color, light and contrast.
Done will save the changes, but don't worry, you can always revert to the original.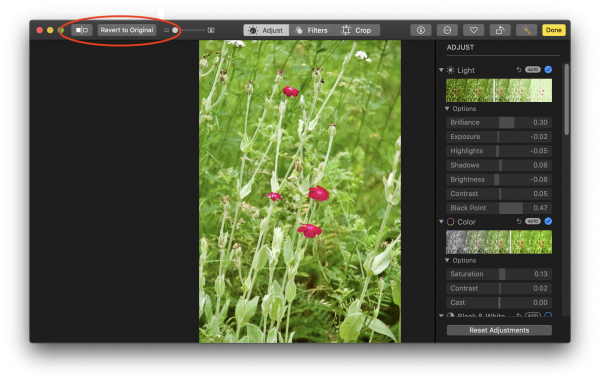
Once you have saved changes two new menu items are added. The first allows you to toggle back and forth to the original vs. the edited version and the Revert to Original button will do just that.
Cropping your photo is an important step. You can straighten the photo if you were holding the camera crookedly, you can improve its composition or just get rid of parts you do not need.
Drag the selection rectangle by its edges or corners. When you let go of the selection rectangle, your cropped photo appears. Use the numbered dial to the right of your photo to straighten it. As you move the dial, a grid appears on your photo to help you with alignment.
You can also adjust aspect and flip your photo. As I was digitizing the slides I noticed that I had put a couple in with the slide reversed. Luckily, I can fix that in Photos.
Here's the original photo from our trip to Trinidad for carnival:

Here it is flipped and cropped:

You can also automatically straighten and crop your photo if you want your Mac to do all the work just by clicking the "auto" button.
In the next part of this article we will talk about Adjusting and the use of Filters.
iOS 16 - Removing Objects from Photos
Adding a Signature to a Document
Upgrade your Apple TV with the new Siri Remote