Using Filters in Apple Photos
Using Filters in Apple Photos
Getting the Picture Right - Photo Editing in Photos App
We talked about cropping, straightening and filters in the last two articles but this week we will talk about the powerful tools built-in to Apple Photo app. You always strive to get the exposure right but accurately exposing a picture, having the right color balance, white point warmth and contrast can be tricky even with the best of digital cameras and bracketing your shot.
Fortunately, the tools that Apple provides in the Photos App are strong and will do the job for most of your precious photographs. If you are lazy and do not want to fine-tune all the adjustments there are two ways to enhance your photos quickly. You can use the filters we talked about last week that are basically preset adjustments or you can use the magic wand which will make some basic adjustments.
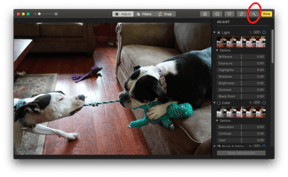

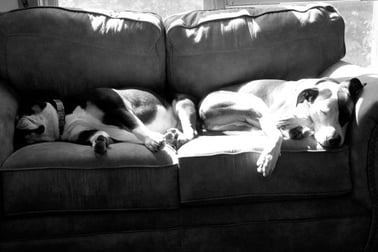
In this photo of Java and Jezebel playing tug-a-waa you will see that the original is a bit dark and some of the highlights of the dogs faces are not so good. Clicking on the magic wand has fixed the picture by adjusting brilliance, exposure, highlights, shadows, brightness, contrast and black point automatically according to Apple's built-in intelligence. Notice the difference in the sliders under the "light" heading. For many photos this is all you need to do.
Other photos may require more work so let's look at each of the sliders and see the impact of them on you photo. You can use the powerful tools in Adjust to fine-tune your photo's light, color, sharpness, and more.
Click the triangle next to each Adjust tool's name to show its controls. Some tools allow even more detailed adjustments; click the triangle next to Options to see everything the tool offers.
You can toggle individual adjustments on and off by clicking the blue circle that appears next to each tool when it's expanded or when hover your pointer over it.
If you want to apply the adjustments you make from one photo to another, just copy and paste them. Open the photo that has the adjustments that you want, click Edit, and choose Image > Copy Adjustments. Then open the photo you want to apply the edits to, click Edit, and choose Image > Paste Adjustments - in this way you have created your own presets.
Light
The first and the most important category of adjustments is Light. The slider at the top will automatically adjust all the Light controls at once with you able to see the impact on the image immediately. However, if. you click on the triangle you will see the additional options that you have, i.e. Brilliance, Exposure, Highlights, Shadows, Brightness, Contrast and Black Point.
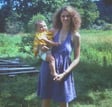
Original washed out image
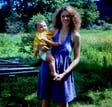
Black point adjusted = richer color
Color
Most of your editing work will be done in the Light category but adjusting color can also improve your photo in some cases. You can adjust the color saturation, contrast and color cast of a photo. Similar to the Light category, you can do broad adjustments of color by using the Color slider but the further options of saturation, contrast and cast are available by clicking on the triangle. Again you can click on the blue circle to toggle your changes on and off or use the boxes in the main menu to toggle all your changes between original and edited versions.
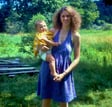
Here's the same photo with some extreme color adjustment:
Black & White
I got my start in photography by shooting black and white. I loved working in the dark room and editing my photos by "burning" and "dodging" photos on the enlarger but Apple Photos gives you black and white editing controls that are simple.
You can modify the intensity of the b & w tones, gray areas and change the grain of a photo using the Apple Photos b & w editing tools. Just as in the other sections there is a big slider that will allow you to edit all at once or you can choose to edit each option.
Retouching
The next section of editing tools allow even more control over your photos. Retouching will allow you to remove blemishes, dust specs and other small marks from your photo. To retouch a photo drag the size slider to select a brush size.After dragging the slider to select a brush size, you can also change the brush size by pressing the Left Bracket ( [ ) and Right Bracket ( ] ) keys.
Position the brush over the mark you wish to retouch and click or drag across the mark to remove it. If the mark is small and isn’t removed on the first try, try zooming in to make finer changes.
If you’re not getting the results you want, you can copy pixels from another part of the photo and apply them to the blemish. Press the Option key while you click an area that has the texture you want, then use the retouch tool to apply the change. Control-click the image and choose “Clear manual Retouch source point” to stop copying pixels from the area.
Red-Eye reduction is helpful whenever your photos have the "devil eyes" caused by light reflection from your subject's eyes, usually from a flash. Using the Red-Eye tool you can click on the "auto" button to have the software automatically remove red-eye and surprisingly that works most of the time. If that does not work use the size slider to make the circle the same size as the red in the eye that you want to adjust, position the pointer over the red pupil of the eye and click. Red-eye reduction will not work with most animals as the reflection is usually green or yellow and not red.
White balance adjustment can make adjustments for the type of light that is present in your photo. Artificial light is different from natural light, light on a cloudy day is different from the light on a sunny day and light at dawn and dusk is special light. The white balance adjustment will allow you to adjust for too yellow of a cast or too blue of a cast caused by the type of light.
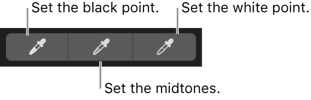
Again, clicking on the "auto" button will make most adjustments for you but if you want to adjust more finely you can choose from neutral gray, skin tone or temperature/tint for the correction you would like to make. Click on the eye dropper icon ![]() and then click the eye dropper on the section of the photo you would like to adjust. You can adjust the warmth with the warmth slider.
and then click the eye dropper on the section of the photo you would like to adjust. You can adjust the warmth with the warmth slider.
The Curves adjustment will allow you to change the brightness and contrast in a photo. You can adjust the overall look of the photo but more importantly for this tool, you can change the look of a specific color (red, green or blue) and adjust the set points for black point, midtowns and white point.
The Curves adjustment shows a histogram with a diagonal line going from the black point (bottom-left corner) up to the white point (upper-right corner). To adjust the brightness or contrast in a photo, you can add points along the line at specific places where you want to change the photo. Drag a point up to increase the brightness; drag it down to decrease brightness. Drag a point left to increase contrast; drag it to the right to decrease contrast.
Noise Reduction will help improve photos taken in low light (at very high ISO) or at extreme telephoto length. This particular tool will also work with photos taken in RAW. This one is simple just move the adjust slider until you are satisfied with the noise reduction.
Sharpen will make the edges crisper and more defined. Be careful with sharpen as if you use too much sharpen the picture loses some reality and will look artificial. You can use the auto button to make the changes or the individual sliders of Intensify, Edges or Falloff.
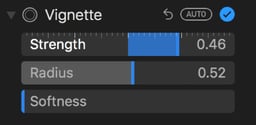
The final editing tool, Vignette, will allow you to darken the edges and emphasize the center of a photo. I still have my vignette tool for my enlarger hanging on the wall of what used to be my darkroom.
You can use the auto button or adjust yourself. To use the vignette tool simply drag the sliders to adjust the vignette.
These are powerful editing tools that Apple gives you for free in the Photos app. For most amateur photographers like me these are the only tools you will need. If you outgrow them there are plenty of 3rd-party editing tools that give you even more control such as GIMP, Luminar or Photoshop.
Using Filters in Apple Photos
Using Apple Photos Editing Tools
iOS 16 - Removing Objects from Photos