The Versatile Apple Wallet
The Versatile Apple Wallet
Now Hear This!
Kibbles & Bytes readers will know that I have written before about hearing aids and Apple's commitment to accessibility. I asked Artie to send me a set of AirPods Pro because with the new iOS you can use AirPods as hearing aids for moderate hearing loss. Since Art and I have been friends for a very long time he cracked that my hearing loss was a result of The Who concert I attended in Berkeley in the 1970. He is probably at least partially right since I was right next to the speakers and couldn't hear for the next few days. I will write about my experience trying the AirPods Pro as hearing aids in an upcoming issue of Kibbles just as soon as I test it out.
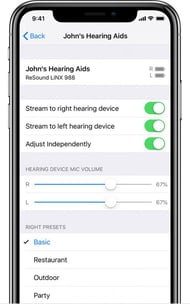
Today, however, I want to talk about the Hearing section of the Accessibility settings. If you are an aging hippy like me you likely have some hearing loss and Apple has some great tools to help you hear and to navigate Apple devices. Let's go over the various tools so you can choose which might work for you. Apple's MFI (made for iPhone) program was extended early on to some hearing aids. Now, just about every hearing aid is part of the program, that is except for the popular Costco Kirkland Signature 10s which I happen to use. You can find a list of compatible HAs here.
MFI Hearing Aids allow you to connect with your iPhone, iPad or iPod touch so you can stream audio, answer phone calls, adjust settings, and more. While my Costco 10s do not use Apple's hearing features that can do all that but to make some adjustments I need to use a different app than Apple's hearing settings. I won't go into how to connect and use MFI HAs here since I have written about it before but Apple has a good write up here.
There is much more to Apple's hearing accommodations.
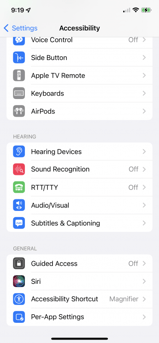
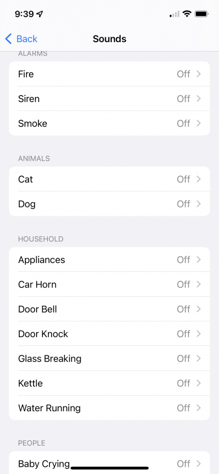
Sound Recognition is pretty cool. Basically, you can choose sounds for your iPhone to listen for and then notify you when it hears those sounds. For example, it can listen for smoke alarms, dogs barking, door bells, glass breaking, water running or a baby crying. Once you activate Sound Recognition you can choose from a list of sounds and when your iPhone hears these sounds it can notify you with a ring ton, a special alert tone and/or vibration.
RTT/TTY
If you have hearing or speech difficulties, you can communicate by telephone using Teletype (TTY) or real-time text (RTT)—protocols that transmit text as you type and allow the recipient to read the message right away. RTT is a more advanced protocol that transmits audio as you type text. To set it up:
When RTT or TTY is turned on, ![]() appears in the status bar at the top of the screen.
appears in the status bar at the top of the screen.
Then you can start a RTT/TTY call by:
If you haven’t turned RTT on and you receive an incoming RTT call, tap the RTT button to answer the call with RTT. You can type your message to be relayed.
Audio/Visual
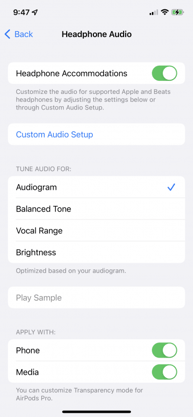
The next setting is audio/visual and there is a lot here. The first choice is whether to turn on Headphone Accommodations where you can customize the audio for most Apple and Beats headphones. Here you can tune your headphones for your personal audiogram if you have that (you can generate an audiogram with a great little app called Mimi that will test your hearing). This is what I will use to tune my AirPods Pro to my specific hearing loss. You can also use this setting to manually adjust audio settings for your Apple or Beats headphones. You can adjust the balance and tone as well as the Transparency mode. This adjusts noise cancellation and will change how you hear your own voice or noise around you. You can play around with the sliders for tone and amplification until you find the setting that seems most helpful for hearing voices and natural sounds. Again this will come in very handy as I tune the AirPods Pro to be hearing aids. You can also activate Conversation Boost which will focus the AirPods Pro microphones on the person who is talking in front of you. We will go into these settings in more detail when we talk about using the AirPods Pro as hearing aids but if you have Apple or Beats headphones you might find some of these adjustments useful in making sound more customized for your taste. You can tune the headphones to hear words more clearly on the phone without raising the volume, get more details in dialogue in movies or music.
Once you set the custom audio for your headphones you can choose to apply them to the phone and/or media and activate Transparency Mode.
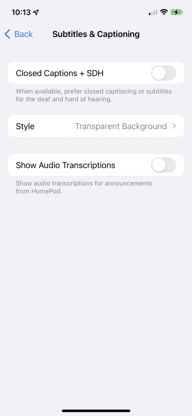
Subtitles & Captioning
The last section will allow you to toggle Closed Captions and SDH (subtitles for the deaf and hard of hearing). You can choose a background for the screen, toggle large text or even create your own custom style.
Apple takes accessibility seriously and these Hearing settings in Accessibility can make your hearing and comprehension much better as well as providing some safety back up as your iPhone listens for your dog barking and flashes you a warning!
The Versatile Apple Wallet
Apple Works to Improve Safety in the Wake of AirTag Stalking Reports
AirPod Max!$$$